- General Safety
- Whitewater Safety
- Sea, Ocean, Big Water Safety
- Hiking | Trekking | Backpacking Safety
- First Aid
General Safety
Preparation
Outdoor activities need to be carefully planned! Defining elements of each trip are navigation, weather, group composition, gear and a safety plan.
Know your limits.
Whether you’re planning a multi-day hike or a canoe day trip, it is important to be aware of your physical and practical abilities and limits before you head out. Do your research and plan your itinerary based on your skill level.
Navigation
Make sure you have enough navigation tools with you. Compass, GPS navigation, Phone navigation apps, Maps, et cetera. Do not rely solely on electrical means. Take actual maps and a real compass!
An important safety measure is to inform others about your plans. Even if you carry a GPS tracker: basecamp, authorities like the local mountain rescue, or others travelling the same route, should be informed about your plans. You can also leave your plans/itinerary under the driver seat of your car. Inform people you know and let them know you have finished your trip safely.
Be weather wise.
Keep an eye on current and predicted weather conditions. Weather can change very quickly. Know the signs for approaching storms or changing weather conditions. Use a weather and emergency radio to stay informed. If you carry a handheld walkie talkie VHF radio, set it up to monitor weather frequenties.
Universal Gear
Gear, used for multiple sports:
| Gear | Whitewater Kayaking | Openwater Kayaking | Trekking | Basecamp | Camper |
|---|---|---|---|---|---|
| Personal Locator Beacon (PLB) | X | X | X | X | X |
| Rescue Laser Light | X | X | X | X | X |
| LED Distress Flare | X | X | X | X | X |
| Rocket / Parachute Flare | X | X | X | ||
| Telephone | X | X | X | X | X |
| Radio & Walkie Talkies | X | X | |||
| Weather & Emergency Radio | X | X | |||
| Emergency Shelter | X | X | |||
| Wood Saw | X | X | X | X |
Zoleo satellite communicator / Personal Locator Beacon (PLB)

The first item I pack (for personal ánd group safety) on every outdoor activity is my Satellite Messenger / Personal Locator Beacon (PLB). In the context of white water kayaking it’ll primarily be my PLB. The Zoleo satellite communicator, can send an SOS alert to activate Search & Rescue, with 24/7 emergency monitoring and dispatch included (provided by GEOS). Both the device and the app have a dedicated button for this.
Not to be used lightheartedly as it will result in the activation of a (helicopter) rescue team, guiding them to your location: When GEOS receives your SOS alert, they’ll know the GPS coordinates of your ZOLEO communicator. They’ll contact the appropriate emergency response authorities for your location, and reach out to the emergency contacts you designated when creating your ZOLEO account.
Using the ZOLEO App, you’ll also be able to message back and forth with GEOS to exchange updates, until your emergency situation has been resolved. Two-way SOS simply isn’t offered by one-way communicators, PLBs and EPIRBs. Even if you’re using the ZOLEO communicator on its own, without the app, you’ll get confirmation that your SOS message was received (via the LEDs on the device).
Most relative techspecs: weight: 150g, IP68 water-resistant to 1.5 m for 30 min, battery life: 200+ hours.
Besides that, the Zoleo will:
- Send and receive messages anywhere over Wi-Fi, cellular and satellite, trying in the following order: Wi-Fi, cellular data, then over the Iridium satellite network, via the ZOLEO device. (Basically the least cost route for the message.)
- Messaging is possible by SMS, email and app-to-app.
- Send Check-in messages with one touch, to let others know you’re OK. Both the device and the app have a dedicated button for this. Your check-in message will be sent to your check-in contact(s). You can also include your GPS coordinates if desired.
- Get DarkSky weather forecasts.
- Share your GPS location with others, via messages. (The Zoleo doesn’t provide a following/tracking feature.)
- This PLB can replace pyro signals, due to it’s GPS communication.
Rescue Laser Light
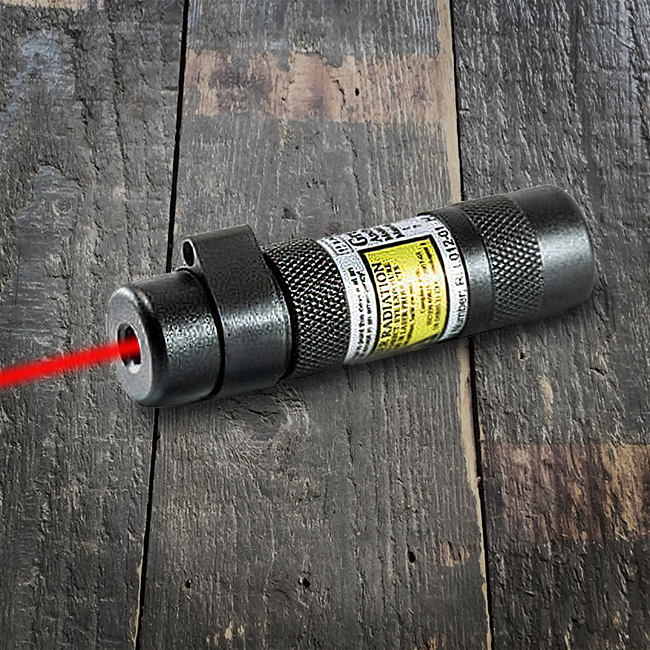
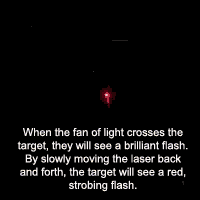
This is my Rescue Laser Light. A Laser Light is a hand-held day and night laser signaling device that provides a convenient, effective way to signal a rescue party. Unlike normal lasers, the Rescue Light isn’t beaming a dot. It beams a vertical fan of light that spreads thousands of feet long at miles of distance, making it easy to get the attention of rescue people, – vehicles or -aircrafts. A target will see a brief, but bright, momentary flash as the laser line crosses their field of vision. At distances of 13 feet or more, the Rescue Laser is perfectly eye safe, yet incredibly effective up to 30 miles away. It’s waterproof, rugged design combines the safety of a laser signaling device with the convenience of a flashlight. The Rescue Laser Light is non-flammable, environmentally safe, and can operate continuously for 40 hours on a single, long-life, replaceable CR123 lithium battery. It has a Sight Ring to help aim at your target.
This Laser can replace compact flares and smoke pots for leading rescue services to your exact location. In mountainous or densely wooded landscape, you’ll need a rocket flare.
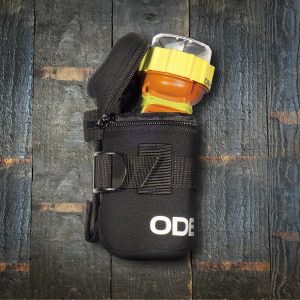
Odeo LED Distress Flare

The Odeo LED Flare (an Electronic Visual Distress Signal Device or eVDSD), is an internationally recognised distress signal and fully SOLAS (Safety of Life at Sea) compliant.
Flares are used to attract the attention of rescue teams. The small size (122x64mm), low weight (150 grams including batteries) and the IP68 rating of this flare makes it an ideal device for mountaineering, skiing, kayaking and other outdoor activities, where an unobstructed views (such as high ground) is available.
This flare can replace compact pyro flares and smoke pots for leading rescue services to your exact location. In mountainous or densely wooded landscape, you’ll need a rocket flare.
The Odeo Distress Flare has both Superbright LED’s and Infra Red LED’s (for night vision goggles), offering both strobe and SOS signals. It uses four L91 Lithium batteries for optimal functionality, which allow it to illuminate for around 9 hours at full illumination (pyro flares, typically, will illuminate for around 60 seconds), they are safer and can even be carried in baggage on flights.
Pyro signals
Wether you go kayaking, paragliding, hill-walking, climbing, skiing and or any other outdoor adventure, you’ll need to think about safety. Pyro signals are among the possible aids at your disposal.

Rocket/Parachute Flare
Handheld Flare
Compact Distress Signal
Smoke Beacon
When in distress and in the right conditions (we do not want to cause a uncontrolled fire), a fire can be helpfull in many ways. For attracting attention, place a fire on high ground, preferably within hearing distance. When out of hearing distance, leave an arrow pointing towards your location. When sight is compromised by rain, mist or clouds, the smell of a fire will give an indication of your location. I pack a lighter and a couple of strips of inner tube. They are argueably the quickest way to make a lasting, smoking and stinking rescue fire.
The bare minimum that one should take when going into the outdoors are Compact Distress Signals. These signals, used to reveal your location when rescue services are sighted, are for day or night-use. I have replaced these for a Led Distress Flare.
A Handflare Mk8 can help helicopter pilots to pinpoint casualty location and give vital information about wind speed and direction. It burns for 60 seconds at 15.000 candela. 176g (6.2 oz) I have replaced these for a Led Distress Flare.
Rocket/parachute flares like my Para Red Rocket Mk8A are set off from the hand, can reach a height of 300 metres (about 1,000ft). Personal/rocket flares have that initial height (can be seen from further afield), a bang, which may grab attention if there’s anyone around. Burning for 40 seconds at 30.000 candela. 235 g (8.3 oz).
I only pack Rocket/parachute flares. I have replaced the other pyro signals with the above mentioned electronic devices.
Telephone & Radio Contact.
Pre Contact
What you preferably know before making Phone/Radio Contact, in order to give rescue services as much information as available:
- Location: Many of the gear we carry around can provide this information, check your maps, telephone, camera, watch and any gps-enabled aparatus. Give them landmarks. Is there a road in sight? Is there a 50×50 meter clearing close by for a helicopter to land? Tell them if you have flairs, beacons, makeshift signs and such. Tell them your last know location, general direction and time since.
- Emergency. Give as much information as possible about why this is an emergency:
- Wounded people? Immobile, bleeding, in shock?
- Stuck, pinned, lost, dead people?
- Lost? Give them landmarks. tell them if you have flairs, beacons and such. tell them your last know location, general direction and time since.
- Urgency. Why is help time-sensitive. Wounded people, pinned people, weather closing in.
International Emergency Telephone Codes & Mountain Rescue Services
Please help me fill this chart with the correct information!
| Country | Phone number | Radio Channel & Frequencies |
|---|---|---|
| Austria | 140 / 144 / 112 | No Radio Call available |
| Bulgaria | (088)1470 / (02)9632000 | 55.475 Mhz or 147.850 Mhz |
| England, Wales, Scotland | 999 / 112 | Radio call frequency restricted to the emergency services |
| France | 112 transfer the calls to the mountain rescue unit. | 150 MHz range |
| Germany, Bavarian Alps, low mountainrange | 112 | Radio call frequencies restricted to the emergency services |
| Italy | 118, activation of HEMS or mountain rescue teams | For mountain rescue only 71.500 / 71.550 MHz, not available for the public. |
| Netherlands | 112 | VHF Channel 10, Freq. 156.500 |
| Norway | 112 (police) / 113 (health service) | Channel 5. Restricted to professionals |
| Poland | 112 / 601100300 | Radio frequency 153.625 MHz |
| Slovenia | 112 | Usually 157.725 MHz (not for public use) |
| Spain | 112 / 062 | Radio call frequency, if there is one available: 146:175 MHz. |
| Switzerland | 144 / 1414 / 112 | 161.300 MHz |
Telephone
Use the telephone numbers in the list on top of this page. This is the best option if available and must take priority over any other communication method you may have at your disposal.
Emergency Calls Only
If your phone is showing ‘Emergency Calls Only’, this means that you will be able to make a emergency call. However, you will not be able to receive incoming calls. Inform the operator of this, as the police and/or Mountain Rescue Team will need to call you back. If someone else in the group has a phone that is not showing ‘Emergency Calls Only’, use their phone for the emergency call, as it will allow incoming calls.
Saving Mobile Battery
The primary function of your phone on any trip, should be for communication in an emergency. In remote areas battery drain can be rapid, and quicker than urban locations, for a variety of reasons, and the following steps will ensure that you have sufficient battery if you do need to make a call.
- either switch off your mobile, or set it to ‘flight’ or ‘aircraft’ mode. Flight mode switches off the phone’s search for a mobile network, and thus prevents battery drain.
- make sure all unnecessary smart phone apps are closed down.
- switch off data, Bluetooth and GPS connections unless required. Some phones allow activation even when in flight mode.
- store your phone in your rucksack and in a waterproof bag or container, but be sure in the prevailing conditions that the ring-tone can be heard (if called for emergency services).
If the signal is shaky or very weak, try SMS/text. Text and await a reply. You must have registered with the service before using. Include your number in case text is onward relayed.
WalkieTalkie/Radio Contact
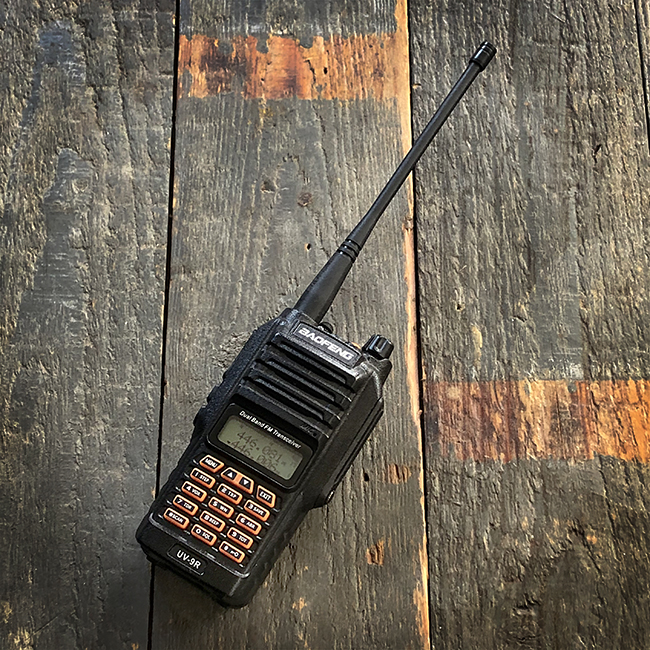
Ideal for group communication as well as in habitated areas and when navigating open water as these can be used on frequencies used by ships as well. You will know if someone has received your message. VHF radios sometimes require an operator to be licensed. But, if the means is available and there is genuine distress, it should be used.
Radio Communications Techniques
There are a few simple practices that can make a big difference in the effectiveness of radio communications. Handheld radios should be held away from the body with the radio and antenna in a vertical position. If the antenna is in contact with the operator’s body, the RF signal strength will be reduced. Holding the radio and its antenna as high as possible will increase the line-of-sight range. The antennas on both transceivers in a radio link need to be in the same plane, or polarization. For VHF/UHF mobile radios, handheld radios, and repeaters, the polarization is always vertical. Having the antennas in different polarities can result in up to a 100-fold loss of signal strength. To transmit a message, hold the radio 5 to 10 centimeters from the face and listen for several seconds to ensure the frequency is available. Press and hold the push-to-talk button for 1 second before speaking, this prevents the first word or two of the message from being dropped. Speak slowly and clearly in a normal pitch, using normal vocabulary. It is often a good idea for the receiving station to repeat radio messages back to the sending station to ensure that the message was correctly understood, particularly if the signal is weak or garbled. One should assume that all radio transmissions are being monitored and that anything said on the radio is being said in public.
Weather & Emergency Radio
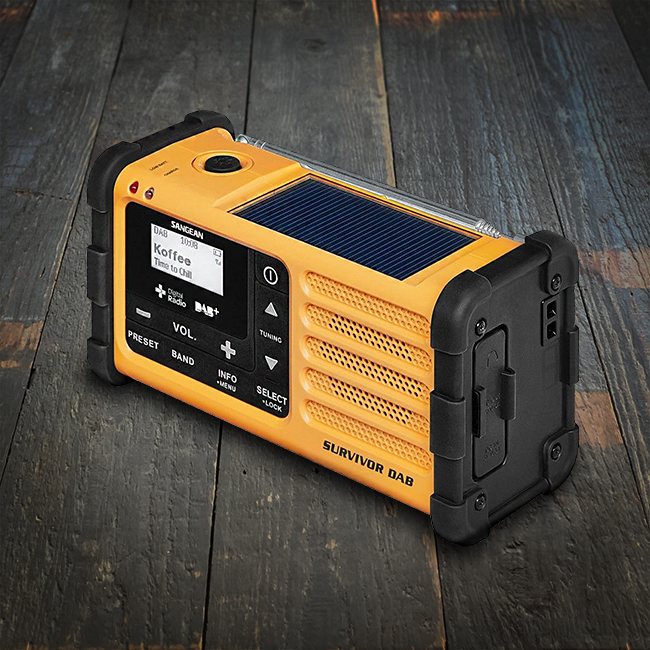
Basecamp, Camping or at Home, as soon as the internet is not available an Emergency Radio can get you the needed information about weather, disasters and what not. But, radio’s need power, so I use the Sangean Survivor because it accepts Micro USB, the hand crank and the solar panel to charge it. You can see if the device is charging with the LED indicator. This radio offers both analogue FM reception and it’s digital successor DAB+. So all you have to do is check the emergency frequencies in your area. The radio will also play your music via speaker or earphone, charge your phone, it has a clock, 20 station presets (10 DAB+, 10 FM) and it has a flashlight with Morse Code SOS.
Sangean Discount Code!
Visitors of my website are offered a €20 reduction on the Sangean website ánd after registration the standard two year guarantee is upgraded to five years. All you have to do is use the reduction code: Whitewatergear
(No, I do not get paid, nor do I get a return fee.)
Emergency Shelter
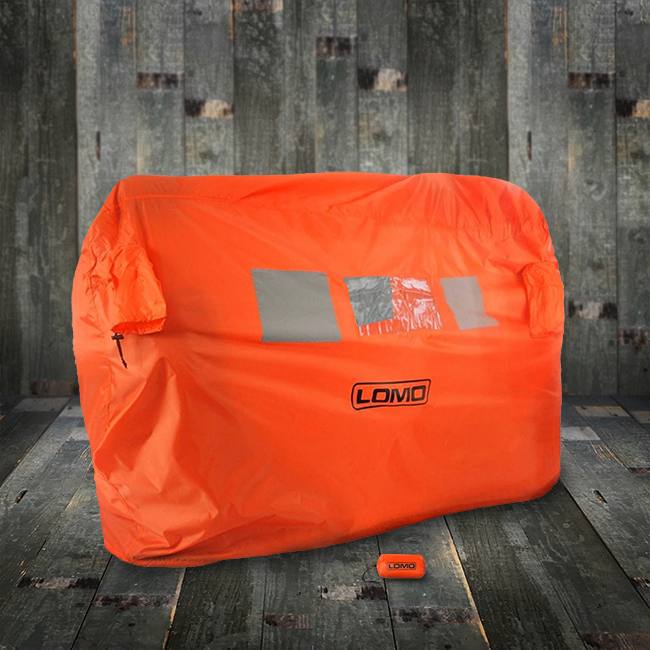
My Lomo Emergency Storm Shelter is a 2-3 man ‘Bothy Bag’. It provides protection from the wind and rain, lightweight, easy to carry and can be pulled over 2-3 people to help keep the elements off them in an emergency. High-viz orange, PU-coated polyester, two large retro reflective patches reflecting, a viewing window and two clossable air-vent snorkels aid ventilation. Packs as small as 21cm x 10cm and weighs 360 grams.
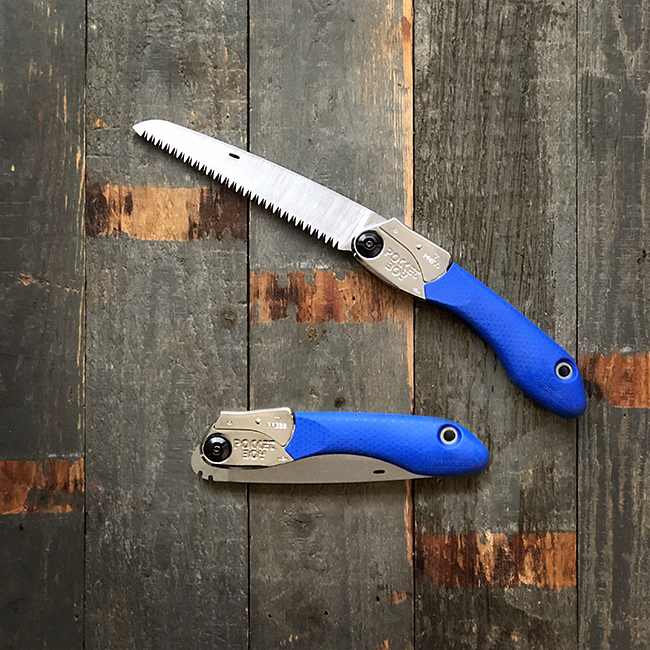
Wood Saw
For clearing your way through a blocked river or freeing a trapped paddler. I use a Silky Pocket Boy, with 170/10 blade.
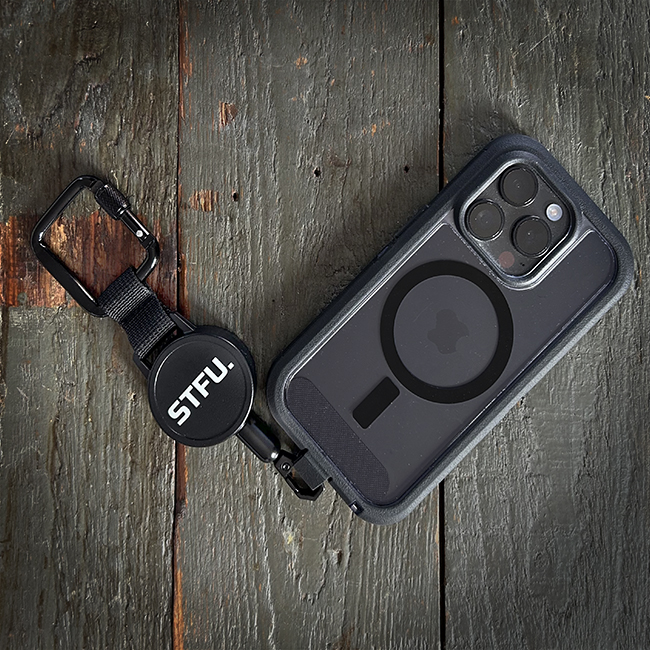
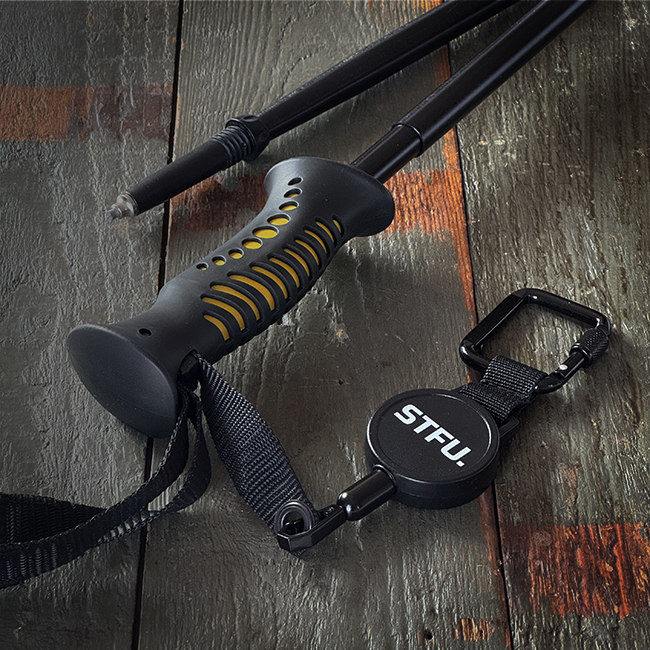
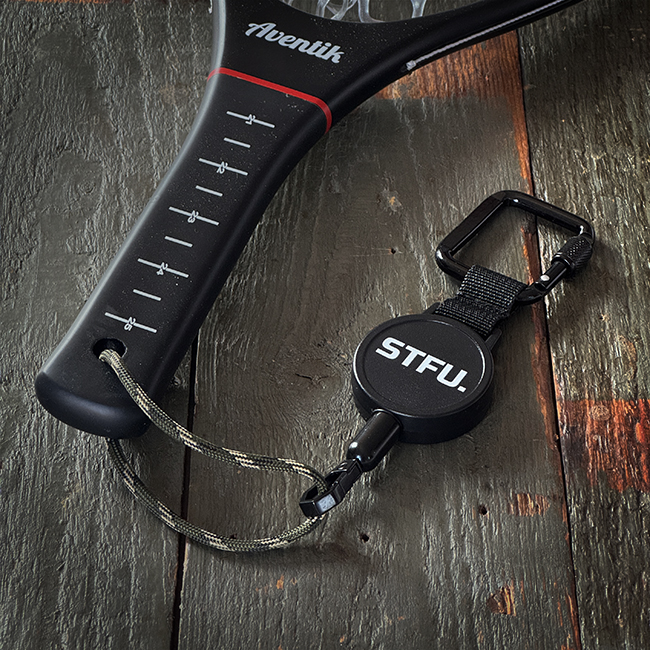
STFU Tethers
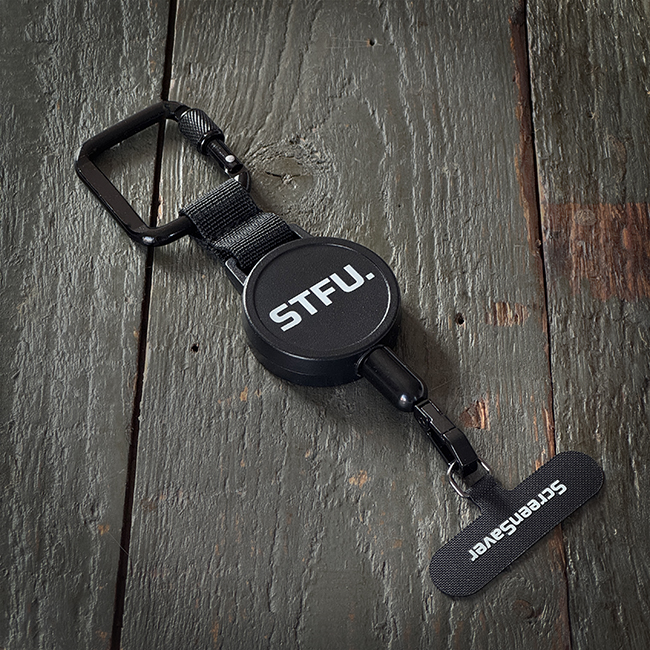
Tethering is one of these safety measures that many of us forget. No safety device is of any use, if not inseparably connected to you and ready to use. My STFU Screensavers are originally designed as festival gear, but ….. These are amongst the strongest tethers I have come across. The are the lightest nor the smallest, but they sure are strong! They use a 90cm rugged, cut-resistant woven steel flexible wire, which unrolls easily, but can hold heavy items as well. A lockable carabiner makes it easy to attach.
I use several of these for various different occasions. One secures my phone to my chestpack, a other attached my wading pole to my belt and yet another is used to secure my fish landing net to my fishing pack. Other applications involve items I want secured whilst travelling and among other people.
 |  |  |
Whitewater Safety
Whitewater safety is a topic that needs attention. Accidents happen. These accidents often result in two safety related stages of aid.
- Rescue: Extricating/rescueing persons and recovery of boats & paddles.
- First Aid: Taking care of wounds and injuries.
Getting injured or pinned in whitewater is a potentially dangerous situation and needs to be solved swiftly and effective. Over the years I have broken several ribs, damaged fingers, toes and what not. Some say injuries are inevitable when pushing limits, no matter how carefull you are.
The first step is to be prepared for these occasions, with both tools and knowledge.
Preparation starts by checking rescue- and first aid kits whilst your still able to replenish your necessities. Make sure you know how to use the kits. Practise your rescue techniques and know how to find things in your first aid kit. When you are ready to board, check for any known health issues within the group that can cause complications during the trip. Also check if all boats have adequate buoyancy blocks & air bags. (If not, consider not risking safety and injuries recovering that boat.) Last but not least, agree on signals to use in an emergency situation. Especially among those that aren’t in distress. (Like ‘stop, we have an emergency!’, ‘come and assist!’, ‘go to the other bank!’, et cetera.) Whilst on the water, both kits need to be easily accessible. Make sure kits are strategically located within the group. The most experienced paddlers are likely to be able to help first when things go wrong.
As a former Rescue 3 Europe Whitewater (WRT-REC) and WRI Swiftwater/Flooding Rescue Technician, I had to seriously update my knowledge to comply with modern day standards, like the ‘Clean principle’. This means I have to update my gear as well. Underneath I’ll keep you posted on my progress, findings and tips. The “Clean Principle” tells us to be aware of any gear snag hazards, that could result in entrapment. Remember: Rope and swift water are and have always been a bad match.
Kayak
Make certain you have the right kayak for the trip!
Check usability, security and strength of grab-handles (all kayaks should have these, preferably no rope loops!). Make sure that the kayak will float when full of water by adding adequate airbags. Check all screws, bolts, footrest and/or bulkhead. Ensure that your spray skirt has a pull-cord for release and is a tight fit.
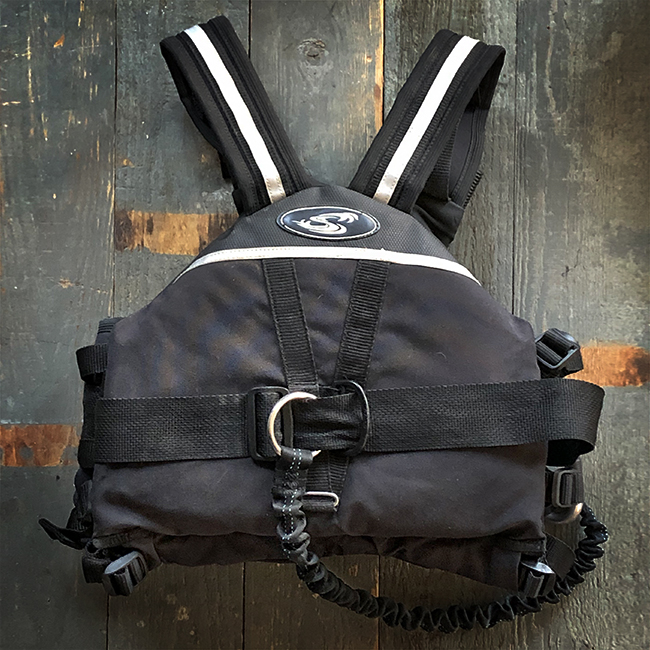
PFD
Wear a CE-approved buoyancy aid when on or near the river, check its floatation and make sure it is in good condition and the correct fit. Ensure all buckles and zips are fastened. I use a Stohlquist Descent Rescue Vest. Check your PFD for loose straps! (You can tug your cowtail inside of the PFD.)
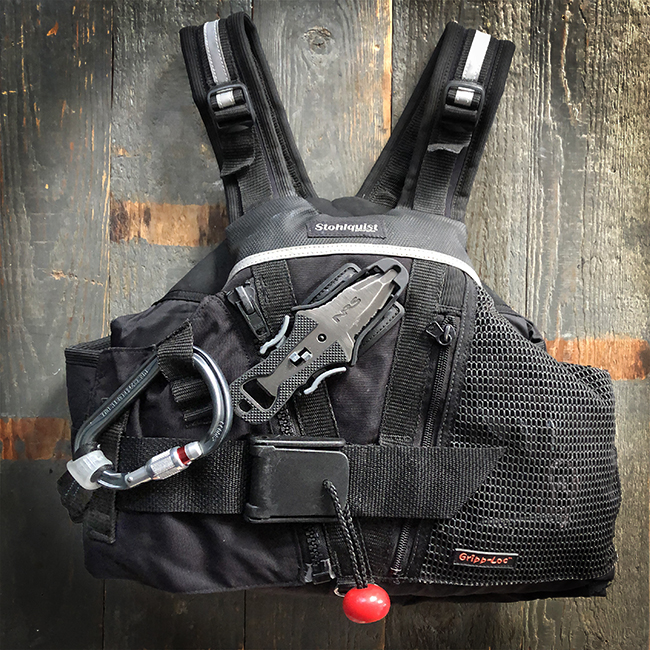
and a Level Six Cow Tail with Prijon biner.
Fully accessorize-able lead paddler’s rescue vest is UL listed and USCG approved for livebait and strong-swimmer rescue procedures. Features an 1100 lb. tensile tested, built-in body harness and a center back-towing anchor point for added control and stability to the rescuer.
 Cowtails/Towing tether
A cowtail is a very useful tool to recover a kayak ‘on the loose’, but only if you are able to run the river safely towing a water filled boat! Use the absolute minimum length required for towing and only use it with a release buckle system. If not in use: tug any slag underneath your PFD.
I use a 50cm (extending to 90cm), CE approved, tubular webbing with integrated bungee tether, fitted with a Petzl William carabiner (position-secured by a Petzl ‘String’ webbing protector).
Helmet
Wear a CE1385 approved, fastened, kayaking helmet when on or near the river. Ensure it fits correctly and snug. It helps if the colour stands out on the river (unlike mine).
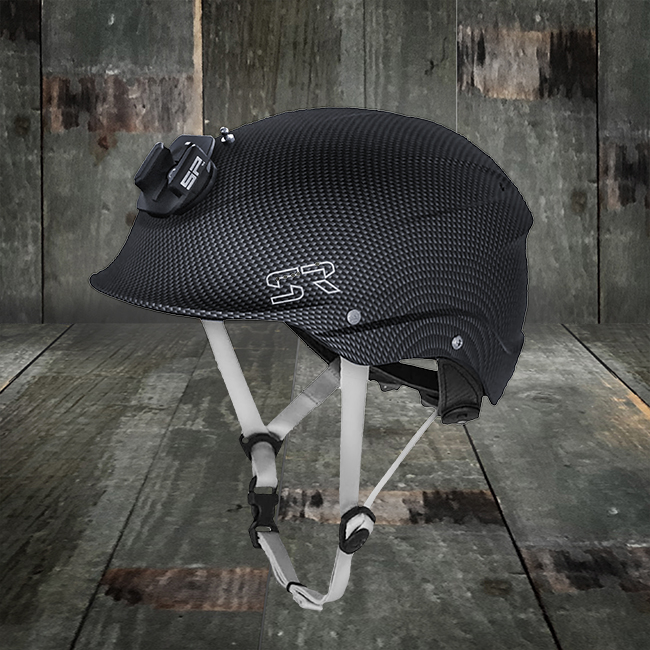
I use a Shred Ready Standard Half cut helmet, safe ánd comfortable!
Spare paddle
At least one member of the group should carry a spare paddle. Any decent splittable paddle will do.

Whistle
For communicating on whitewater, when your voice isn’t strong enough. I use an Acme Tornado 2000 professional referee stadium whistle, which blows out any water easily and has loads of volume (up to 122 decibel).
Protective clothing
Wear and/or carry sufficient warm protective clothing for the trip. I always wear/carry a paddle jacket, neoprene shorts and rashguard shirt in summer. In winter I add a long john wetsuit, neoprene paddle jacket, a neoprene hat and pogies. A dry suit would be a great addition.
Wear footwear suitable for carrying your kayak up- and downhill or scouting the river. Footwear should be free of anything that could catch.
Throw bag
The way most brands configure their throwbags is not suitable for whitewater use. Throwbags should not have any loops or knots that can get snagged. Nor should they have any hardware attached that can injure swimmers. I prefer to carry two throwlines:
A Palm Lightning 18m/8,5 mm polypropylene kernmantle throwline, , ideal for quickly bagging swimmers. Small bag, quick deploy, right in front of my seat.
And a 9,5-10mm (better grip than 8mm), 20-25m throw line, containing a Spectra core. The Spectra core will increase the breaking strength from 9kN (polypropylene) to 16kN. This strength is needed for heavy lifting and moving big loads, like when unpinning a kayak. I store this behind my seat.
Unpin kit
Together with other rescue related items on this page, I carry a Z-Drag kit, stowed in an 8 liter drybag.
Flip line
Flip lines can be used for many different kayaking purposes, the most common being as an anchor line to secure your boat, for a reach rescue and as a rescue anchor. I use a 4 meter webbing sling, with a Kayak carabiner. Made from strong tubular nylon webbing‚ its two sewn end loops can be joined with a carabiner to make a continuous loop‚ or left apart as a 4 m straight sling. A flip line should be carried inside your PFD or stowed in your kayak, not around the waist, as this is dangerous and not ‘Clean’.
Knife
Knives are an essential piece of gear, especially when working with rope. Your knife needs to be easily accessible with one hand. It should cut rope easily (serrated blade) and not have a sharp point. Do not tether the knife as this is not ‘Clean’.
I use a NRS Co-Pilot Knife (that is small enough to fit my current PFD) and a Wichard Rescue Knife (which is slightly bigger and better cutting).
Abilities and knowledge
- All the gear above should be used by trained individuals. Follow a Swiftwater rescue course. Practice regularly and keep refreshing your knowledge!
- Know the whitewater class you can handle and be prepared to portage rapids beyond this ability. If you are not sure, buddy up with an experienced group member.
- Class I: Beginner
Fast moving water with riffles and small waves. - Class II: Novice
Straightforward rapids with wide, clear channels which are evident without scouting. Occasional manoeuvring may be required. - Class III: Intermediate
Rapids with moderate, irregular waves which may be difficult to avoid. Complex manoeuvres in fast current and good boat control in tight passages or around ledges are often required. - Class IV: Advanced
Intense, powerful but predictable rapids requiring precise boat handling in turbulent water. A strong Eskimo roll is highly recommended. - Class 5: Expert
Extremely long, obstructed, or very violent rapids which expose a paddler to added risk. - Class VI:
Extreme and Exploratory Rapids
These runs have almost never been attempted and often exemplify the extremes of difficulty, unpredictability and danger.
- Class I: Beginner
- Be prepared to self rescue, including whitewater swimming and a reliable Eskimo roll.
- Know Basic Life Support and have a current first aid certificate.
Sea, Ocean, Big Water Safety
Big Water safety is a topic that needs attention. Accidents happen. These accidents often result in two safety related stages of aid.
- Rescue: Extricating/rescueing persons and recovery of boats & paddles.
- First Aid: Taking care of wounds and injuries.
Two of the most ocurring problems on big water are hypothermia and getting seperated from your kayak. Hypothermia occurs when wet, wind, and cold overwhelms the body’s ability to produce and to retain heat. Hypothermia can arise from a several minute unpredicted rescue in cold water; from days of rainy, cool conditions. Hypothermia can lead to a state of hypovolemic shock.
The first step is to be prepared for these occasions, with both tools and knowledge.
Preparation starts by checking rescue- and first aid kits whilst your still able to replenish your necessities. Make sure you know how to use the kits. Practise your rescue techniques and know how to find things in your first aid kit. When you are ready to board, check for any known health issues within the group that can cause complications during the trip. Also check if all boats have adequate buoyancy compartments, blocks and/or air bags. Last but not least, agree on signals to use in an emergency situation. Whilst on the water, kits need to be easily accessible. Make sure kits are strategically located within the group. The most experienced paddlers are likely to be able to help first when things go wrong.
Practice all your rescue techniques on rough water as well, as that is the situation you will most likely need them in. And, practice the most effective techniques and gear that suits your specific skills and preferences.
I prefer to get in my kayak upside down and then do an eskimo roll (a kayak filled with water rolls very easily) and I prefer a foot operated bilge pump so I have my hands free to paddle. Just saying.
Kayak
Make certain you have the right kayak for the trip!
Check usability, security and strength of grab-handle and deck lines. Make sure that the kayak will float when full of water by adding adequate airbags or compartments. Check all screws, bolts, footrest and/or bulkhead. Ensure that your spray skirt has a pull-cord for release and is a tight fit.
Life Jacket
Wear a CE-approved buoyancy aid when on or near the river, check its floatation and make sure it is in good condition and the correct fit. Ensure all buckles and zips are fastened.
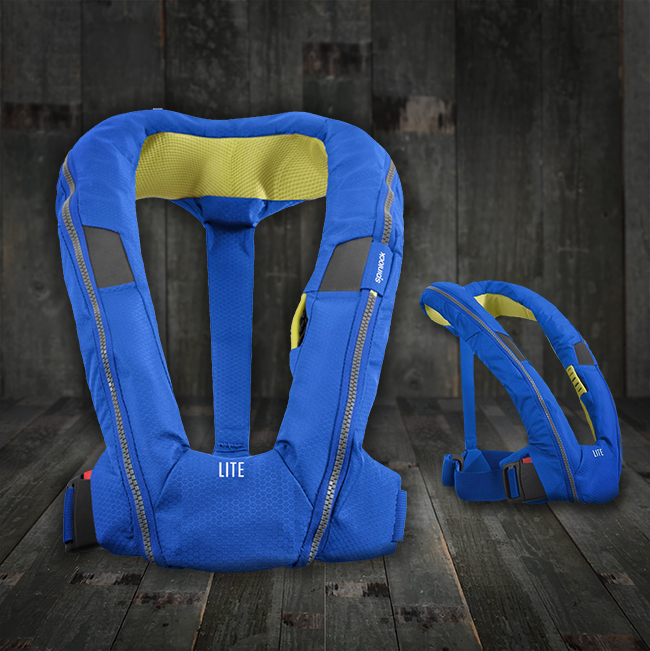
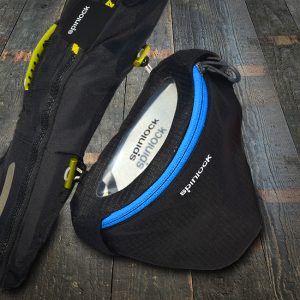
I use the Spinlock Deckvest LITE Lifejacket, with Chest Pack for all non-whitewater activities, like sea-kayaking, sup boarding, fishing and such. These are very compact, low profile and lightweight vests. They have a one buckle closure/release. Due to there narrow profile, they will not interfere with a paddling or fishing motion. The neoprene neck panel adds to very comfortable fit and wear.
These are very easily converted to manual operation using the Manual Conversion Kit. After all, you do not want the lifejacket to inflate every time you roll your kayak or fall of a SUP-board. After this conversion, the lifejacket operates on simple 33g CO2 Cylinders, which are readily available. No rearming kit needed!
The Chestpack is a very well designed, non obstructive, add-on to pack some snacks, a whistle and what not.
Hand Bearing Compass V-Finder
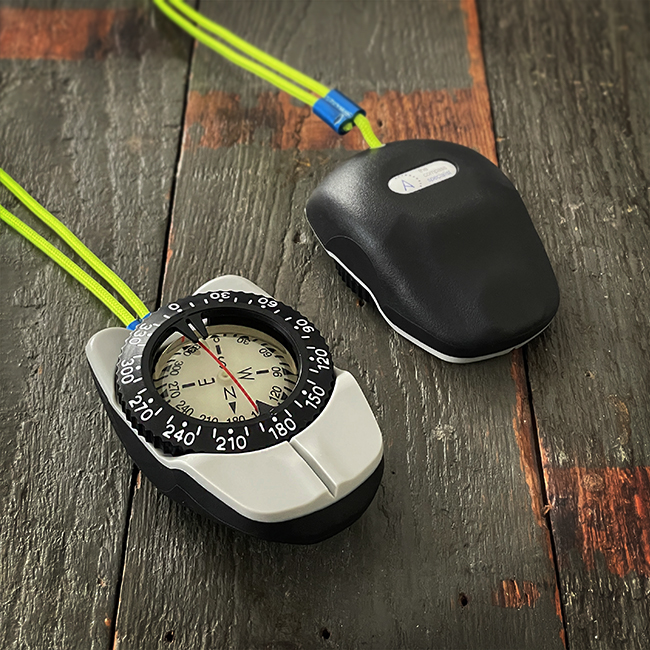
I use the Autonautic Hand Bearing Compass ‘V-Finder’. This compass has a unique ergonomic and ambidextrous (left and right handed) design, made from a soft feel material that won’t slip when wet. It is very durable, shock resistant and needs no functional maintenance. The V-Finder is as basic as can be with two main functional elements: the rotating dial and the memory/course ring. No fuss big water navigation at it’s best (at a very affordable price)!
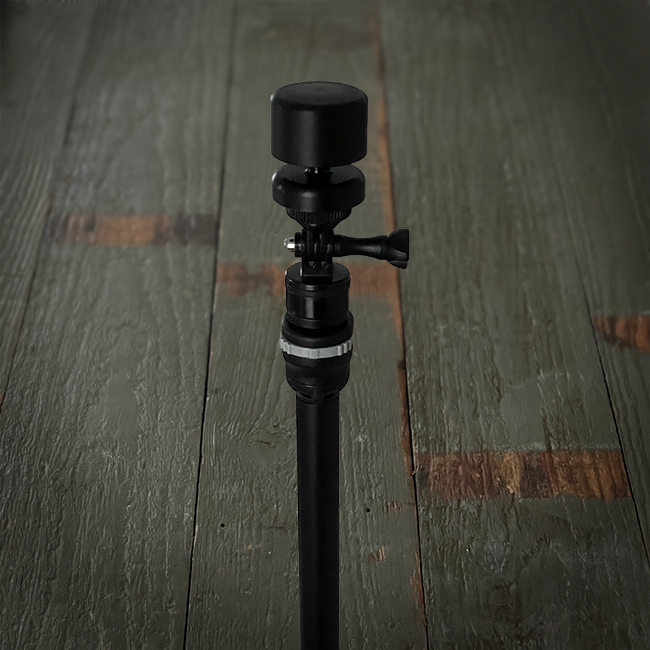
Ultrasonic Portable Mini Wind Meter
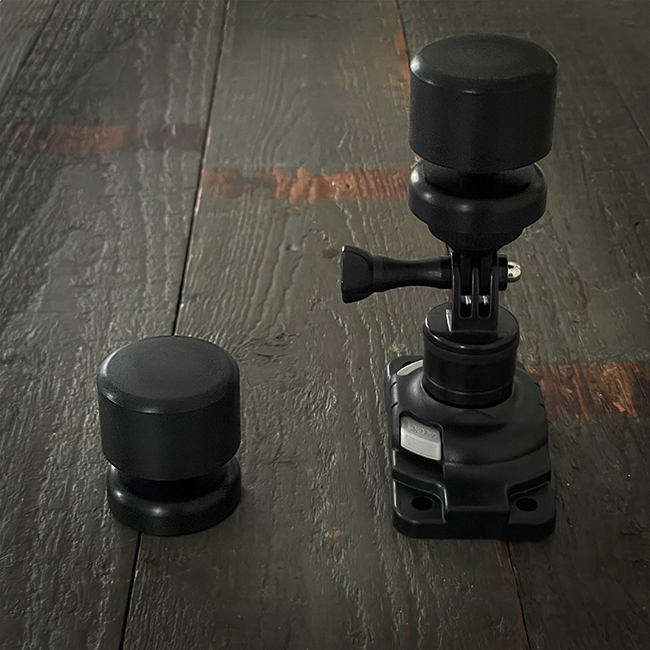
This the Ultrasonic Portable Mini wind meter made by Calypso Instruments. A bluetooth, rechargeable ultrasonic windmeter, with a mere 40mm diameter, weighing 78 grams. It’s rated IPx8, so rolling a kayak is no problem. A 1.4 female thread ensures mounting on any tripod compatible device. A 1.4 male screw comes included. I use the wind meter (in combination with my Vaaka Paddle Cadence Sensor) to interpret training results, but mainly for navigation purposes.
For navigation, different kinds of speed can be measured and calculated in different ways. This wind meter registers both wind speed and direction (without the use of moving parts). These are the wind related parameters to combine when navigating open waters:
- AWS (Apparant Wind Speed) is the actual speed and direction of the wind blowing as experienced when moving/paddling. (This is what the wind meter actually measures.)
- TWS (True Wind Speed) is the actual speed and direction of the wind blowing as experienced when stationary. (Calculated by subtracting the kayak’s speed from the AWS.)
Due to the low speed of a kayak, the difference between the AWS and TWS will usually be negligible.
I advice to use the AWS, as this is what the device actually measures.
- Then there is AWA (Apparant Wind Angle) related to the direction of kayaking. (This is what the wind meter actually measures.)
- The TWA (True Wind Angle) the actual wind direction. (Calculated by combining the direction of the kayak and the direction of the AWA).
- The last element is the Speed of your kayak. (Calculated by connected GPS.)
The wind meter comes with a wireless charger supplying a full (internal) battery with plenty of power to paddle all day. It communicates wireless with your phone which can calculate and combine the measurements with GPS data plotted on a (Google) map and many other nice-to-haves. Calypso offers a free app for navigation purposes.
Hiking | Trekking | Backpacking Safety
Chestpack
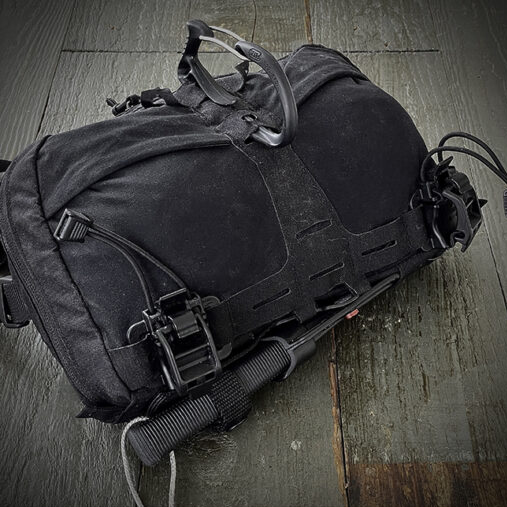
As a solo hiker, I use a chestpack, al-the-time and everywhere, with all the essentials, should something bad happen.
Default, my chestpack contains the following items:
- Zoleo PLB & Satellite Messenger
- Rescue Laser light
- Fenix PD32 Flashlight
- Fällkniven A1x knife
- Leatherman Tools
- Suunto Compass
- Telephone
Abilities and knowledge
BEFORE YOU SET OFF ON A HIKE, IT’S IMPORTANT TO KNOW THE LEVEL OF DIFFICULTY SO YOU CAN KIT YOURSELF OUT PROPERLY, ALLOW SUFFICIENT TIME TO COMPLETE THE HIKE AND, MOST IMPORTANTLY, ASSESS WHETHER YOU’RE CAPABLE OF DOING IT!
SAC hiking scale:
| LEVEL | PATH | TERRAIN | REQUIREMENTS | MARKING SWISS WALKING PATHS (SWW) | MARKING GERMAN ALPINE CLUB (DAV) |
|---|---|---|---|---|---|
| T1 Hiking | Well developed, signposted and marked. Somewhat exposed places very well secured. | Flat or slightly inclined. No danger of falling with appropriate behaviour. | No steady footing necessary. Can be walked in trainers. Navigation without a map possible. | Yellow | Blue |
| T2 Mountain hiking | Continuous route and passage marking. | Steep in parts. Danger of falling not excluded. | Some steady footing Trekking shoes recommended. Basic navigation skills. | White-red-white | Blue or red |
| T3 Challenging mountain hiking | A footpath is usually available. Exposed places mostly secured with ropes or chains. | Partially exposed areas with danger of falling, gravel plains, pathless steep terrain. | Good steady footing Good trekking shoes. Average navigation skills. Basic Alpine experience. | White-red-white | Red |
| T4 Alpine walking | Path not necessarily available. Sometimes need to use hands to keep going. | Mostly exposed. Tricky grass heaps, rocky slopes, simple firn fields and snow covered glacier passages. | Familiarity in exposed terrain. Stable trekking shoes. Terrain assessment and good navigation skills. Alpine experience. | White-blue-white | Red or black |
| T5 Challenging Alpine walking | Often without a path. Individual, simple climbing sections. | Exposed. Challenging terrain, steep rocky slopes, snow covered glaciers and firn fields with danger of slipping. | Mountaineering boots. Secure terrain assessment and very good navigation skills. Good Alpine experience also in high Alpine terrain. Elementary knowledge in handling a pickaxe and rope. | White-blue-white | Black |
| T6 Difficult Alpine walking | Mostly without a path and unmarked. Climbing sections up to II. | Often very exposed. Tricky rocky slopes, snow covered glaciers with increased danger of slipping. | Excellent navigation skills. Proven alpine experience and familiarity with alpine equipment. | Mostly unmarked | Mostly unmarked |
SAC mountaineering scale
| FRENCH | ENGLISH | ROCK | UIAA LEVEL | FIRN & GLACIERS |
|---|---|---|---|---|
| F Facile | Easy | Simple walking terrain (boulder, stone ridge) | From I | Simple firn slopes, hardly any crevasses |
| PD Peu difficile | Not very hard | Mostly walking terrain, increased step safety necessary, climbing sections clearly arranged and unproblematic. | From II | Mostly less steep drops, short passages steep, few crevasses |
| AD Assez difficile | Fairly hard | Repeated securing necessary, longer and more exposed climbing areas | From III | Steeper slopes, many crevasses, small Bergschrund (mountain crevasse) |
| D Difficile | Hard | Good navigational sense and efficient rope handling required, long climbing sections, usually belaying | From IV | Very steep slopes, many crevasses, large Bergschrund |
| TD Très difficile | Very hard | Continuous belaying in difficult places, persistently challenging climbing | From V | Continuously steep terrain |
| ED Extremement difficile | Extremely hard | Wall passages that require great commitment | From VI | Very steep and vertical places, ice climbing required |
| ABO Abominable difficle | Incredibly hard | Extremely steep, partly overhanging wall passages | VII and more | Extreme ice climbing |
CLIMBING SCALE (UIAA)
| DIFFICULTY | DESCRIPTION (ROCK CLIMBING) |
|---|---|
| I Slight difficulties | Simplest form of rock climbing (not easy walking terrain!) Hands required for balance. Beginners secured to the rope. A head for heights is required. |
| II Moderate difficulties | Movement with simple combinations of steps and handles (three-point-technique). |
| III Medium difficulties | Intermediate securing at exposed points is recommended. Vertical places or overhangs with good grip require physical effort. |
| IV Great difficulties | Substantial climbing experience required. Longer climbing sections usually require several intermediate safety devices. |
| V Very great difficulties | Increasing number of intermediate safety devices. Greater physical requirements, climbing technique and experience. |
| VI Extreme difficulties | Above-average ability and good level of training required. Great exposure, often combined with small sites. Good conditions are usually a prerequisite for conquerability. |
| VIII Exceptional difficulties | Only achievable through increased training and improved equipment. Acrobatic climbing ability and command of sophisticated safety technology are essential. |
| VIII to XI+ | A verbal definition is not possible here. This is a further increase in the difficulties to be faced, which place ever greater demands on climbing skills and physical and mental performance. |
First Aid
Know Basic Life Support and have a current first aid certificate!
Accidents happen and can create potentially dangerous situations needing to be solved swiftly and effective. Over the years I have had my fair share of mishaps. Some say injuries are inevitable when pushing limits, no matter how carefull you are.
The first step is to be prepared for these occasions, with both tools and knowledge.
Preparation starts by checking your rescue- and first aid kits whilst your still able to replenish your necessities. Make sure you know how to use the kits. Practise your rescue techniques and know how to find things in your first aid kit. When you are ready to leave, check for any known health issues within the group that can cause complications during the trip.
It is mandatory to carry a First Aid Kit that fits your ability to act. Carry what you might need and know how to use. As a former Commando Medic and Rescue 3 Europe Whitewater (WRT-REC) and WRI Swiftwater/Flooding Rescue Technician I have a specific (but limited) level of knowledge. That’s what my personal kit reflects. Pack your kit to help yourself, so you can locate the right components whilst in distress.
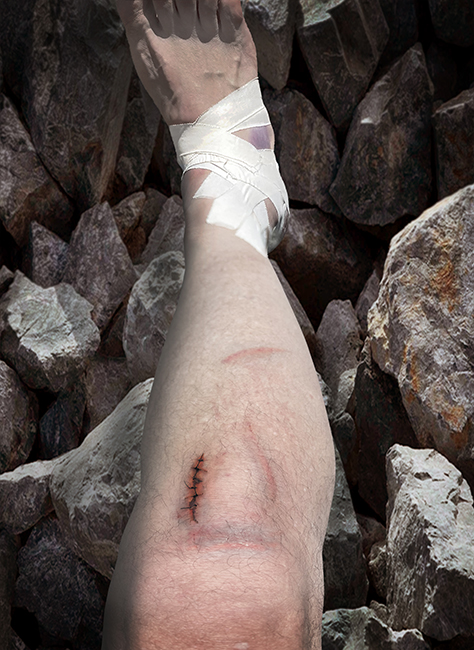 | Pack your First Aid Kit with products and tools you can actually use! Sometimes events take a turn for the worse. While solo walking the Black Cuillin counter-clockwise around Loch Coruisk (start/finish at Elgol), a piece of Collies Ledge gave way, and me and my 25 kg backpack fell 7 meters onto a small lower ridge. (luckily) I had a 6 cm cut showing the subcutaneous patellar tendon and tore two ankle ligaments. This meant I had to suture/stitch the cut and had to tape my ankle. I knew how to perform this self help ánd had the gear with me. The alternative was to use my PLB and send a distress signal to the rescue services. |
My Basic First Aid Kit
My Basic First Aid Kit is packed in a 8 liter waterproof bag containing a Venimex venom extractor kit, a windlass tourniquet and an adapted combination of the ‘Care Plus Mountaineer‘ & ‘Care Plus Refill kit – Sterile‘ First Aid Kits. (My own extra additions in Blue):
Emergency
- Emergency blanket
- Tourniquet
- Emergency bandages 12×12 cm
- An Emergency Shelter
- Acme Tornado 2000 professional Emergency whistle
Wounds
- Compresses
- Compresses 5×5 cm
- Non-sticking compresses 10×10 cm
- Small tampons (nose bleeds)
- Plasters
- An Igneous ultralight Leuko Tape spool.
- Plasters 25×72 mm
- Plasters 60×100 mm
- Wound plasters 10 x 25 cm (really big)
- Spray Plaster (quick, waterproof)
- Plasters 19×38 mm
- Finger plasters
- Knuckle plasters
- Blister plasters 5×5 cm
- Bandages
- Hydrophilic bandages 5 cm x 4 m
- Care Plus® Waterproof bandage 8 x 6 cm
- Hydrophilic bandage 7.5 cm x 4 m
- Net bandage
- Triangular cloths
- Wound closure
- Suture & needle 75 cm/nylon
- Set of butterfly stitches (5)
- Blood lancets
Splinting
- Splint 36″ (arm-sized splint)
- Finger Splint (kayaking specific)
- The Igneous ultralight gorilla tape spool
- Kinetic Sports tape, 2.5 cm x 10 cm
- Non Elastic Athletic tape (for joint fixation and relieve)
Hygiene
- Mouth-to-mouth facemask
- Vinyl gloves
- Alcohol wipes
- Betadine (disinfectant)
- Katadyn Micropur (Water Purification Tablets)
Reference
- Doctor’s statement
- Care Plus First Aid Guidance Card
- Guide to emergency signals
Tools
- Sharpie Marker
- Packet of safety pins (6 pins)
- Leatherman Raptor Rescue Rescue/First Aid Scissors
- Tweezers
- Needles and syringes
- Scalpel
- Duct tape
Environmental
- Tick remover
- Lipstick/lip balm
- Haago Body Warmers, 4x sets
- Heat It insect bite treatment
Assessment
- unbreakable thermometer
Medicines
- Immodium (Loperamide is a medicine to treat diarrhoea)
- Bisacodyl (Laxative treating constipation)
- Paracetamol (pain relieve)
- Epi-pen adrenaline-autoinjector (treating allergic reactions)
- Glucagon Injector (treating Diabetis)
- Oral Rehydration Salts Sachets (treating dehydration)