Table of Contents
Whitewater Safety
Whitewater safety is a topic that needs attention. Accidents happen. These accidents often result in two safety related stages of aid.
- Rescue: Extricating/rescueing persons and recovery of boats & paddles.
- First Aid: Taking care of wounds and injuries.
Getting injured or pinned in whitewater is a potentially dangerous situation and needs to be solved swiftly and effective. Over the years I have broken several ribs, damaged fingers, toes and what not. Some say injuries are inevitable when pushing limits, no matter how carefull you are.
The first step is to be prepared for these occasions, with both tools and knowledge.
Preparation starts by checking rescue- and first aid kits whilst your still able to replenish your necessities. Make sure you know how to use the kits. Practise your rescue techniques and know how to find things in your first aid kit. When you are ready to board, check for any known health issues within the group that can cause complications during the trip. Also check if all boats have adequate buoyancy blocks & air bags. (If not, consider not risking safety and injuries recovering that boat.) Last but not least, agree on signals to use in an emergency situation. Especially among those that aren’t in distress. (Like ‘stop, we have an emergency!’, ‘come and assist!’, ‘go to the other bank!’, et cetera.) Whilst on the water, both kits need to be easily accessible. Make sure kits are strategically located within the group. The most experienced paddlers are likely to be able to help first when things go wrong.
As a former (Rescue 3 Europe Whitewater (WRT-REC) and WRI Swiftwater) Rescue Technician, I had to seriously update my knowledge to comply with modern day standards, like the ‘Clean principle’. This means I have to update my gear as well. Underneath I’ll keep you posted on my progress, findings and tips. The “Clean Principle” tells us to be aware of any gear snag hazards, that could result in entrapment. Remember: Rope and swift water are and have always been a bad match.
Whitewater Safety Gear
Whitewater safety is a topic that needs attention. Accidents happen. These accidents often result in two safety related stages of aid.
- Rescue: Extricating/rescueing persons and recovery of boats & paddles.
- First Aid: Taking care of wounds and injuries.
Getting injured or pinned in whitewater is a potentially dangerous situation and needs to be solved swiftly and effective. Over the years I have broken several ribs, damaged fingers, toes and what not. Some say injuries are inevitable when pushing limits, no matter how carefull you are.
The first step is to be prepared for these occasions, with both tools and knowledge.
Preparation starts by checking rescue- and first aid kits whilst your still able to replenish your necessities. Make sure you know how to use the kits. Practise your rescue techniques and know how to find things in your first aid kit. When you are ready to board, check for any known health issues within the group that can cause complications during the trip. Also check if all boats have adequate buoyancy blocks & air bags. (If not, consider not risking safety and injuries recovering that boat.) Last but not least, agree on signals to use in an emergency situation. Especially among those that aren’t in distress. (Like ‘stop, we have an emergency!’, ‘come and assist!’, ‘go to the other bank!’, et cetera.) Whilst on the water, both kits need to be easily accessible. Make sure kits are strategically located within the group. The most experienced paddlers are likely to be able to help first when things go wrong.
As a former (Rescue 3 Europe Whitewater (WRT-REC) and WRI Swiftwater) Rescue Technician, I had to seriously update my knowledge to comply with modern day standards, like the ‘Clean principle’. This means I have to update my gear as well. Underneath I’ll keep you posted on my progress, findings and tips. The “Clean Principle” tells us to be aware of any gear snag hazards, that could result in entrapment. Remember: Rope and swift water are and have always been a bad match.
Kayak
Make certain you have the right kayak for the trip!
Check usability, security and strength of grab-handles (all kayaks should have these, preferably no rope loops!). Make sure that the kayak will float when full of water by adding adequate airbags. Check all screws, bolts, footrest and/or bulkhead. Ensure that your spray skirt has a pull-cord for release and is a tight fit.
PFD
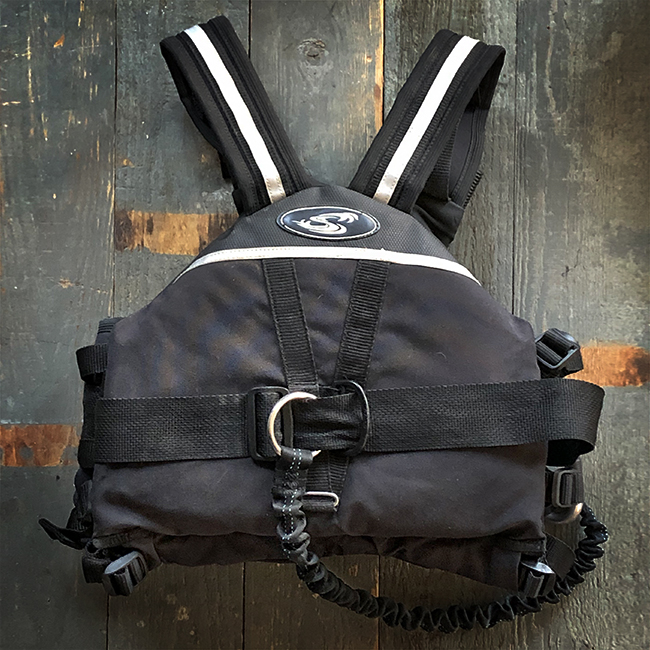
Wear a CE-approved buoyancy aid when on or near the river, check its floatation and make sure it is in good condition and the correct fit. Ensure all buckles and zips are fastened. I use a Stohlquist Descent Rescue Vest (not sold in Europe….).
Check your PFD for loose straps! (You can tug your cowtail inside of the PFD.)
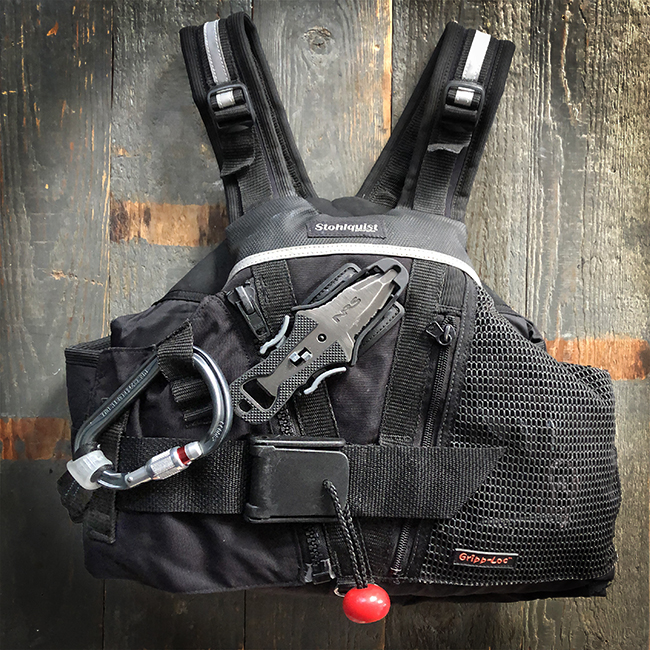
and a Level Six Cow Tail with Prijon biner.
Fully accessorize-able lead paddler’s rescue vest is UL listed and USCG approved for livebait and strong-swimmer rescue procedures. Features an 1100 lb. tensile tested, built-in body harness and a center back-towing anchor point for added control and stability to the rescuer. Features three “Modes of Operation” versatility for a variety of rescue situations.
Features:
- Shoulder Strap Tensile – measures the strength of the shoulder strap, the adjustment hardware and the assembly to the body of the vest. The minimum to pass the test is 150 lbs. per shoulder. Each Stohlquist vest tests to 300 lbs. per shoulder–double the standard strength! (X-traxt™ 1100 lbs. / shoulder.)
- 300-pound zipper tensile – Vest horizontally mounted from an iron form with 300 lbs. attached perpendicular to the slide of the zipper. The effective load applied is transferred to all of the seams, giving you confidence in your PFD.
- 1100 pound slip / 25 pound release – What do you know of that weighs 1100 pounds…a horse, maybe a small car? Imagine hanging that mass from our building’s steel girders attached only by our Quick Release “QR” belt. Guaranteed minimum slippage at 1100 pounds, yet made to release quickly and easily with no more than 25 pounds of pull on the “QR” release tab.
- Strong-Swimmer harness – Use with the QR Belt™ and Re-traxt™ tow system for rescue and water extraction.
- Crotch-harness capable – Add one 6 footer cam strap to your rescue kit. Position it’s Ancra buckle at front for easy release. Adds an extra measure of security for particular rescue situations.
 Cowtails/Towing tether
A cowtail is a very useful tool to recover a kayak ‘on the loose’, but only if you are able to run the river safely towing a water filled boat! Use the absolute minimum length required for towing and only use it with a release buckle system. If not in use: tug any slag underneath your PFD.
I use a 50cm (extending to 90cm), CE approved, tubular webbing with integrated bungee tether, fitted with a Petzl William carabiner (position-secured by a Petzl ‘String’ webbing protector). The 50cm tether fits snugly around my PFD, minimising the chance of entrapment. (image above)
Helmet
Wear a CE1385 approved, fastened, kayaking helmet when on or near the river. Ensure it fits correctly and snug. It helps if the colour stands out on the river (unlike mine).
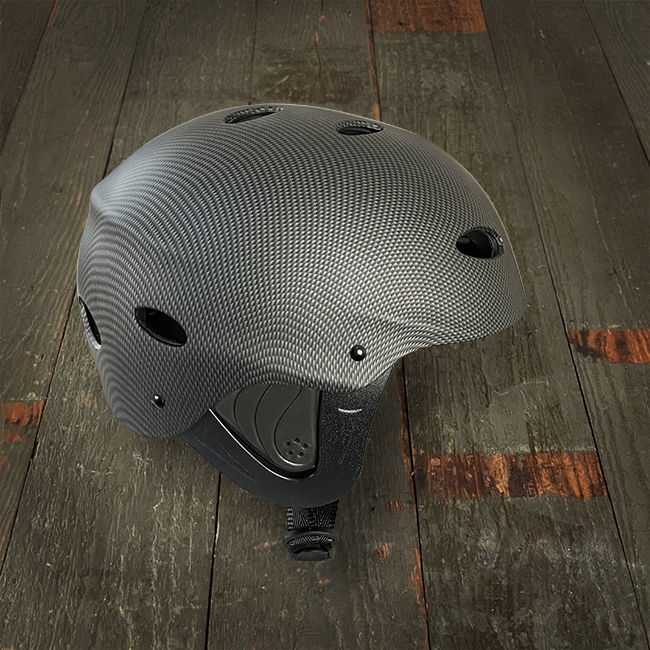
I use Tontron Helmets because they are very affordable, yet safe ánd comfortable!
Spare paddle
At least one member of the group should carry a spare paddle. Any decent splittable paddle will do.
 Ophion Enduro Whitewater Paddle | 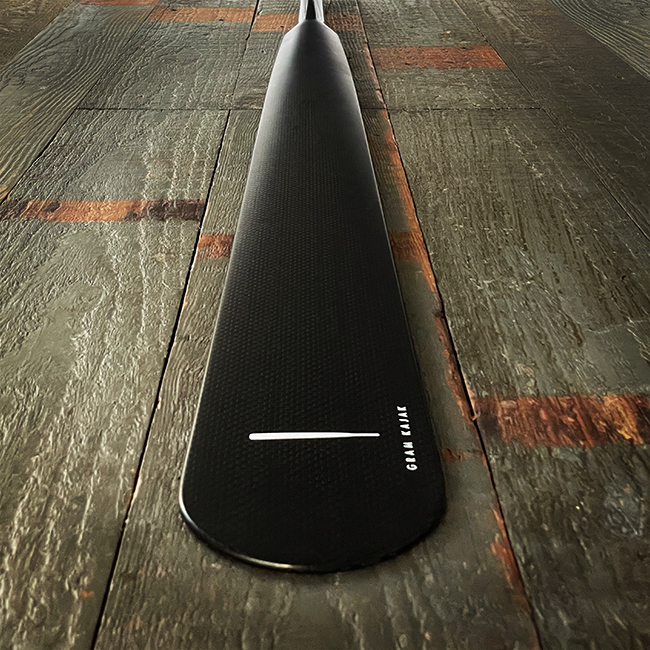 Gram 900D Carbon, Greenland Style Paddle |
Whistle
For communicating on whitewater, when your voice isn’t strong enough. I use an Acme Tornado 2000 professional referee stadium whistle, which blows out any water easily and has loads of volume (up to 122 decibel).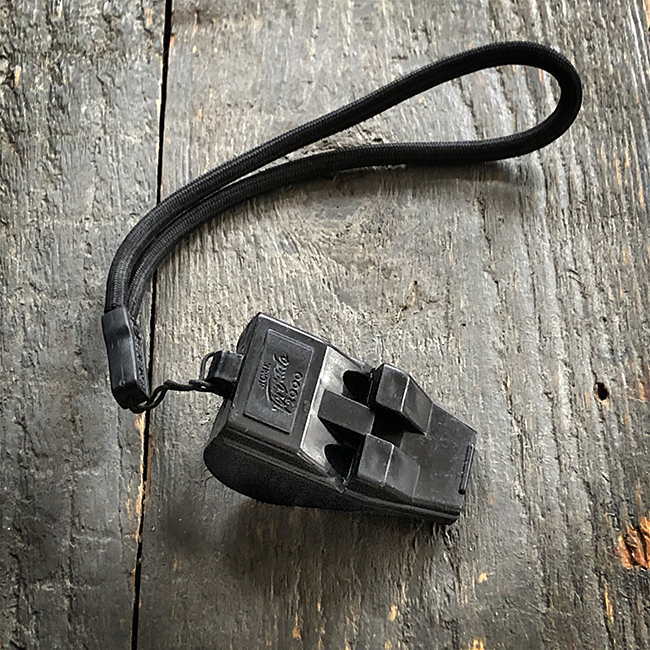
Protective clothing
Wear and/or carry sufficient warm protective clothing for the trip. I always wear/carry a paddle jacket, neoprene shorts and rashguard shirt in summer. In winter I add a long john wetsuit, neoprene paddle jacket, a neoprene hat and pogies. A dry suit would be a great addition.
Wear footwear suitable for carrying your kayak up- and downhill or scouting the river. Footwear should be free of anything that could catch.
Throw bag
The way most brands configure their throwbags is not suitable for whitewater use. Throwbags should not have any loops or knots that can get snagged. Nor should they have any hardware attached that can injure swimmers. I prefer to carry two throwlines:
A Palm Lightning 18m/8,5 mm polypropylene kernmantle throwline, , ideal for quickly bagging swimmers. Small bag, quick deploy, right in front of my seat.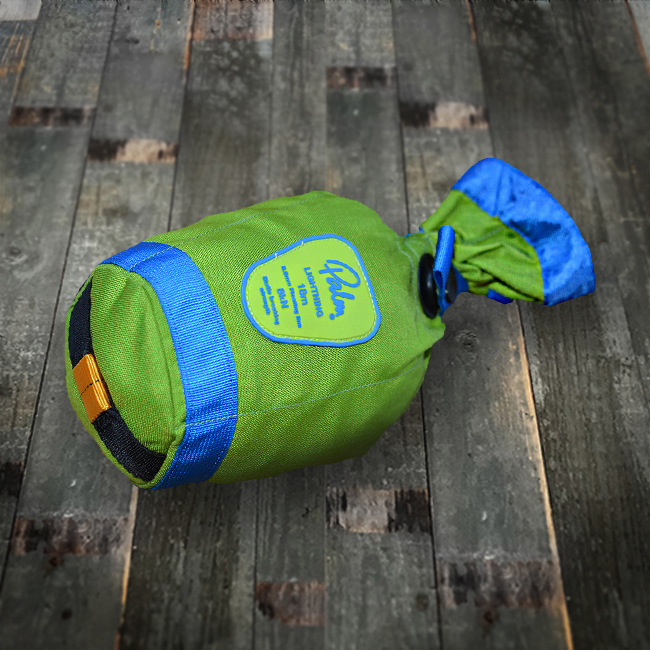
And a 9,5-10mm (better grip than 8mm), 20-25m throw line, containing a Spectra core. The Spectra core will increase the breaking strength from 9kN (polypropylene) to 16kN. This strength is needed for heavy lifting and moving big loads, like when unpinning a kayak. I store this behind my seat.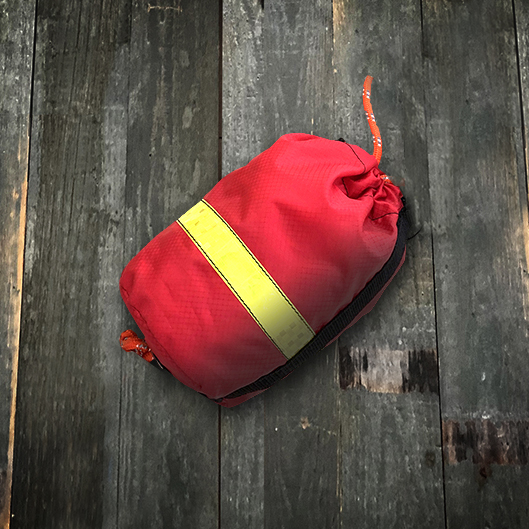
Unpin kit
Together with other rescue related items on this page, stowed in an 8 liter drybag, inside the kayak:
- Four Locking carabiners
Do NOT use carabiners with snagging noses.
Green: a non-snagging nose. Red: a snagging nose.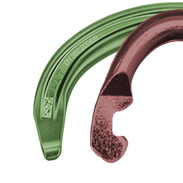
- Two Ultralight Pulleys and one Blocking Pulley
- Three 120cm Webbing slings
This a schematic drawing of the 3:1 pulley system I use ánd the 5:1 kit I would like to use.
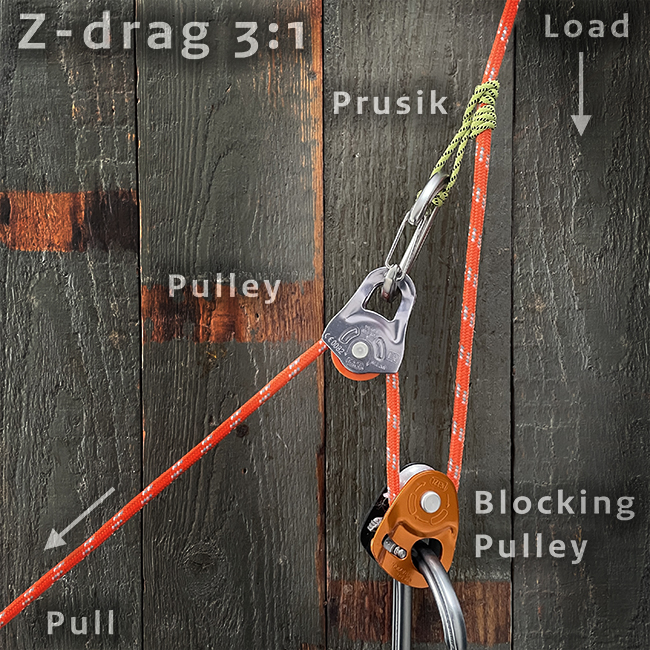 | 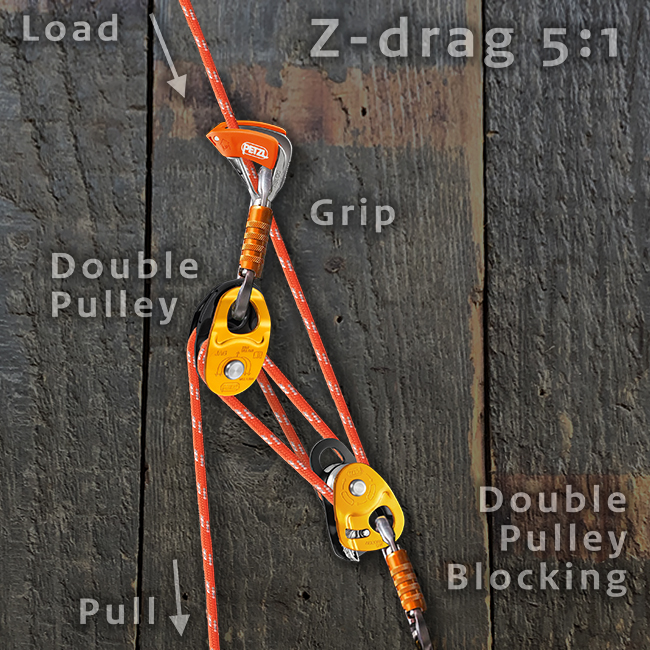 |
| 3:1 ● A Petzl Micro Traxion Blocking Pulley, with Petzl William biner ● a Petzl Oscillante Pulley i.c.w an older Petzl Wire biner and a Prusik rope (will be replace by a Petzl Rollclip icw a Petzl Tibloc) | 5:1 (wishlist) ● A Petzl Jag Traxion Double Blocking Pulley ● Petzl Jag Double Pulley ● Two Petzl OK biners ● A Petzl Tibloc. |
Flip line
Flip lines can be used for many different kayaking purposes, the most common being as an anchor line to secure your boat, for a reach rescue and as a rescue anchor. I use a 4 meter webbing sling, with a Petzl William carabiner. Made from strong tubular nylon webbing‚ its two sewn end loops can be joined with a carabiner to make a continuous loop‚ or left apart as a 4 m straight sling. A flip line should be carried inside your PFD or stowed in your kayak, not around the waist, as this is dangerous and not ‘Clean’.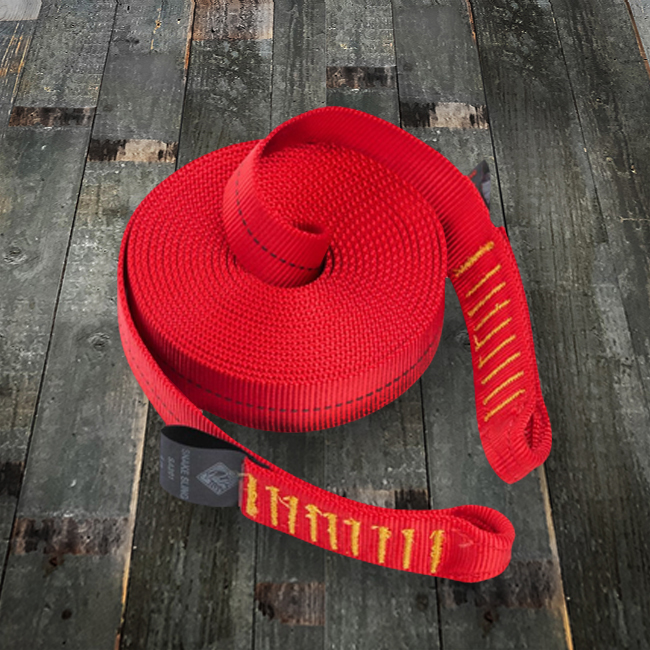
Knife
Knives are an essential piece of gear, especially when working with rope. Your knife needs to be easily accessible with one hand. It should cut rope easily (serrated blade) and not have a sharp point. Do not tether the knife as this is not ‘Clean’.
I use a NRS Co-Pilot Knife (that is small enough to fit my current PFD) and a Wichard Rescue Knife (which is slightly bigger and better cutting).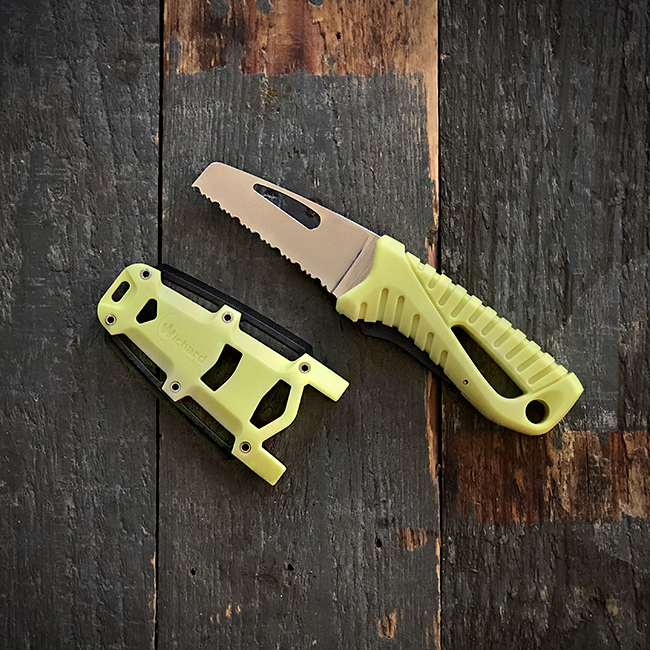
Abilities and knowledge
- All the gear above should be used by trained individuals. Follow a Swiftwater rescue course. Practice regularly and keep refreshing your knowledge!
- Know the whitewater class you can handle and be prepared to portage rapids beyond this ability. If you are not sure, buddy up with an experienced group member.
- Class I: Beginner
Fast moving water with riffles and small waves. - Class II: Novice
Straightforward rapids with wide, clear channels which are evident without scouting. Occasional manoeuvring may be required. - Class III: Intermediate
Rapids with moderate, irregular waves which may be difficult to avoid. Complex manoeuvres in fast current and good boat control in tight passages or around ledges are often required. - Class IV: Advanced
Intense, powerful but predictable rapids requiring precise boat handling in turbulent water. A strong Eskimo roll is highly recommended. - Class 5: Expert
Extremely long, obstructed, or very violent rapids which expose a paddler to added risk. - Class VI:
Extreme and Exploratory Rapids
These runs have almost never been attempted and often exemplify the extremes of difficulty, unpredictability and danger.
- Class I: Beginner
- Be prepared to self rescue, including whitewater swimming and a reliable Eskimo roll.
- Know Basic Life Support and have a current first aid certificate.